


We have discussed numerous different things every week, but this week I came to realize that we have not discussed one of the key features with Microsoft 365, and that is sharing your files. Today, we are going to touch base on how to share your files, how to manage access at the point of sharing, and finally, how to manage access after the document has already been shared. We have touched base a little bit on sharing in our Quick Tips to Save Time When Working With Document Libraries, so there may be a little bit of overlap.
Sharing Your Files
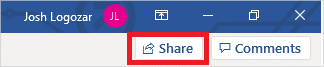
To start, let’s look at how to share our files directly within the Office 365 application that you are using. Once you have gotten your document ready to the point of sharing, the first thing that you are going to need to do is to make sure that you have your document saved to OneDrive. Once you have saved your document, you can now be free to share! To start sharing your document, click on the “Share” button in the top right corner of your application.
Once you have clicked your “Share” button, you are going to get a pop up that looks like this:
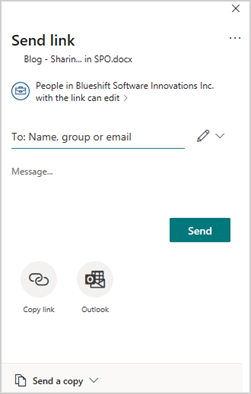
From top to bottom, the first thing you are going to notice is by default your "who you are sharing with" section. We are going to touch on that shortly. The next thing you will notice is Name, group, or email. This is the first way you can share your documents. Simply enter the names, the Teams groups, or the email addresses that you want to share to, and then click on the dropdown to change if they can edit or not. Once you have entered the names of the people you want to share with, simply click "Send".

Once it has been sent off, they are going to receive an email notification that states that you have share a document with them. From there, they can just click on the "Open" button, and it will open up in their browser.
Setting Who Can Access a Shared File
Now, let's go back to the “Who are you sharing with” section, which will be the one that (by default) will be set at “People in <<Your Organization>> with the link”. If you click on this, you are going to have a few different sharing options to choose from. It is going to look like this:
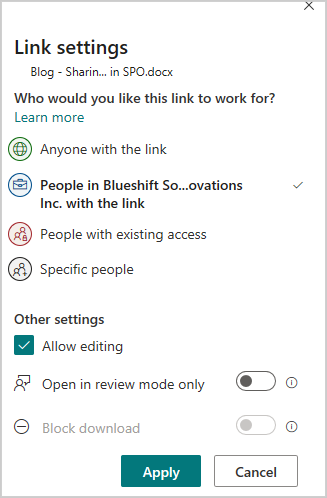
As you can see, you do have a few different options for sharing. You have:
- Anyone with the link: Anyone who has the link has access to the document. That means that if someone forwarded the link along, that person they sent it to would have access.
- People in <<Your Organization>> with the link: This means anyone in your organization with the link has access. This includes anyone that has had it forwarded along.
- People with existing access: Anyone with the access before you creating this link will have access.
- Specific people: Only the specific people you have sent it to will have access to the document.
Note: Options available to you may be dependent on the policies applied by your administrator.
Once you have selected which type will suit your need, you will then get to select if the people are allowed to edit the document. If you choose that they can edit the document, you may also select that the document opens in review mode, which will allow them to make changes and leave comments. But you will get a chance to review them, and choose to accept or reject the changes.
If you choose to not allow editing, you are also given the option of blocking them from downloading a copy of the document. This helps in keeping your shared documents secure and makes sure that there is only one copy out there being worked on at a time.
Sharing Files Using a Link
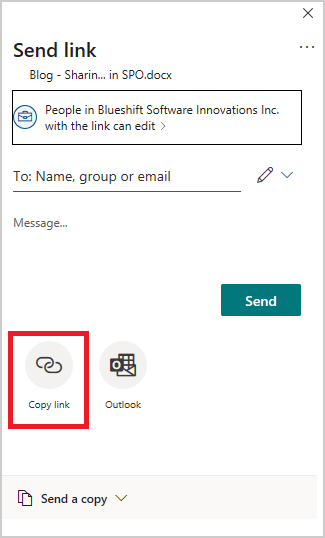
The last part that we will touch on for sharing is by sharing using a link. If you want to share a document using a link, for example, into a Teams channel, all you need to do is simply click on the “Copy link” at the bottom of your sharing pop-up. It will automatically copy to your clipboard and generate a link that you can send out as well.
Managing Permissions to Your Document
We have now shared out our document, but what happens if we don’t need it to change anymore? Or if someone is changing it when it's not required and is causing issues? Managing permissions to your documents is super easy.
To start, open up your OneDrive Online. we are going to go our “Share” button (click on the “…” beside the document we are looking to change), and bring up our share pop-up. From here, click on the “…” in the top right-hand corner, and click on “Manage access”

From here, you are going to see the people that have access to this document. Depending on where you are saving your document, you are going to be the owner, however, any Group permissions that are set up will reflect here.
As you can see, everyone that is part of our marketing group has the ability to view and edit, but guests can only view the document. This is also going to include anyone that you have shared the document with by entering their name or email in your share pop-up.
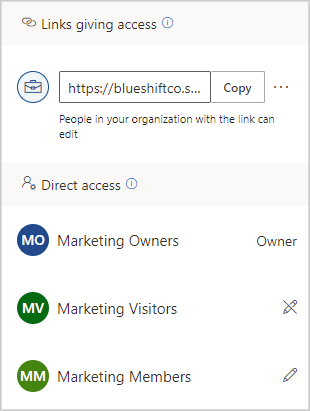
To chance the ability to edit, all you need to do is click on the “Edit” icon and simply change it to “Can’t edit”.
Now, we have an issue if we have shared it out using the link. The people that have access to the document via direct links means they do not appear on this list. To see who has access using the link, click on the “…” beside the link.

From here, you can see everyone that has access. When you share the link, you sadly cannot change the permissions of the user, so the solution will be to disabled the link, and when you need to share it again, you will create need to create a new link. To disable and existing link, click on the “X” beside it.

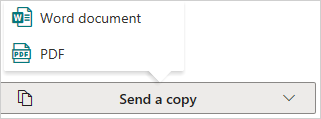
You should note that if you are sharing a document through your Microsoft 365 application, you will notice an extra option at the bottom of your share pop-up called “Send a copy”. If you ever need to send a copy of your document, for whatever reason, you can do that by clicking this. It will give you the option of the program your in document (i.e. a Word document, an Excel document, etc.) or a PDF. Once you have selected which document type you would like, you will get an email pop-up with the document already attached.
Sharing is Fast and Easy in OneDrive
I would always advise sending the links by simply entering the name and email, so that you have constant control of who is editing your document, and who has access to it. But if that is not possible, you now know how to manage who has access to your document with these two methods of sharing.