


A lot of our meetings are happening in Microsoft Teams. This is a change that I feel is here to stay, even post COVID-19. It has cut our travel times down exponentially and created a sense of how we can create teams, connections, and do business from a distance. With all of these great things that are occurring, it has led us to a hot button subject: Virtual meeting etiquette.
We are going to go over a few tips that are going to make meetings you attend more efficient, and make sure that you are not the person that is causing the distractions, as no one wants to be known as that person.
Note: All these examples are being done on the Microsoft Teams desktop app, your experience may vary if you are using the web-based Teams.
Test Your Devices
Going into a meeting and not being able to hear, or be heard, or even being heard too much can be an embarrassing moment. The best way to make sure that this will never happen is in your settings. The feature is called “Make a test call.”
We are going to start by going to our settings, which can be accessed by clicking in your top right bar, where your profile picture is located, and selecting "Settings".

Once you're in the Settings screen, click into "Devices", and you will see a “Make a test call” button.
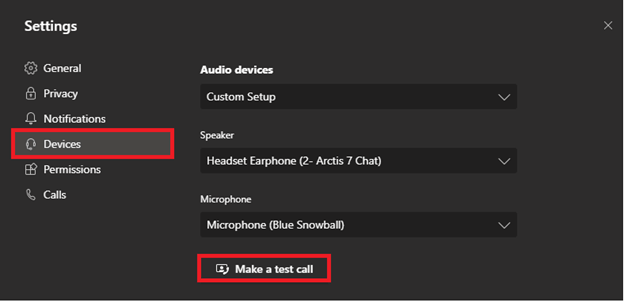
Now that you've clicked on that, you will be put into a call with Teams Echo, which will tell you to record a message, and it will play it back to you. This way you can hear what your microphone sounds like, and what your camera looks like. You can use this to make sure that your microphone levels are neither ear bleeding loud, nor too quiet that people will have to focus to listen to you. This will also help you check to make sure that your headphones and camera are working properly and coming in clear.
Configure Your Pre-Meeting Screen
The pre-join screen is your best friend! After you click "Join a meeting", you will get a prompt that will give you a few options. This is going to cut down on a few common mistakes you see. The first one being your background. There are some things in your background that cannot be stopped, like the partner walking in, or your cats hopping up on your lap, or your really cute dog sitting in the background because they want treats.
These are things that people will enjoy and can create some more conversation. The times that this may be an issue is if you have a whiteboard right behind you with company plans, ideas, or any sort of personal login information. This is where it can cause some major problems. An easy way to make sure that you are not distracting anyone in the chat is by using a background blur.
We have discussed at length how to change your Teams background. Here is a quick refresher on how to blur your background. First, when you enter your meeting, select the “Background Filters.” Then all you will need to do is select the blur background (highlighted below).

The other thing that the pre-meeting screen is going to help you out with is making sure that you are muted when you are entering the meeting. Imagine this scenario: you are in a meeting, you are there for support, so while listening and paying attention, you are not talking. Your partner, dog, cat, or whomever else it may come in, and you start up a conversation (Yes, I talk to my animals). You forget to mute yourself, and your entire meeting hears about how your cat was a brat, or how your partner needs to go spend some more money.
Think about how many times you have seen this in a meeting, and how simple of a solution it may be. The best rule of thumb is: if you are not talking, mute your mic. This will help limit any background noise or distractions that you may not hear if you have your headphones in.
Share the Correct Screen
Ever been part of a meeting where someone is sharing a document, and they want to refer to something else, they change the screen, but nothing changes on their screen share. This is a very common mistake that occurs with presenters. Let’s take a peek at how to screen share, and when is the best use case for each different type.
To start, the share screen button is located in the top right of your meeting, and the only people that can present their screen are the presenters. If you need to promote someone to presenter, take a look at our tips for productive meetings in Teams.

Once you have selected to share screen, you are going to have a few options at the bottom. You are going to see Desktop, Window, Whiteboard, and PowerPoint as your main options.
The first one you are going to see is Desktop, and then the screens labeled. This will be a good choice if you are showing multiple things and flipping through multiple screens.
Note: make sure that you are selecting the correct screen, number one being your primary monitor, and screen two if you have a second one. This will make sure that you are not sharing anything with your meeting partners that you don’t want them to see.
The other options that you will see are the Windows that you have open. This is what you select if you only have one website, form, document, etc. that you want to share. You will not be able to show anything else without stopping the share screen and having to reshare. This can be pretty jarring for your participants.
The last piece that you will see with options is Whiteboard (if it is enabled in your tenant), which is a shared whiteboard that can be written on by people in your tenant, meaning that if you are having meetings with external users, you cannot use this feature.
The last note that I will say about screen sharing, is that if you are sharing a video or a presentation that has sound, ensure that you are clicking on the "Include computer sound."

Preach Virtual Meetings Etiquette
Do any of these mistakes sound like you or something that your co-workers or end users may do on more occasions than you would like to admit? We have a solution! Bloom Software provides training that will give your users a 'learner's permit' in Teams. These are non-formal training sessions in which we show you the ins and outs of using Teams on a daily basis and any other Microsoft 365 questions that they may have. This will get them to a point of comfort to help with user adoption.
Still not sure if that's enough? We also provide a flat rate support model that will help with day-to-day technical support, informational requests, and will give you a predictable annual cost, with no scary surprise fees.