


Last week we built out an issue tracker that would send us notifications using Power Automate. This week, we are going to continue to build on it. Now, imagine a scenario where you oversee an I.T. team, and you want internal users to submit issues, but not have the ability to edit your lists.
To accomplish this, we are going to build a very basic form, which can be put into your home SharePoint site, and use a Power Automate flow to take the information from that form and put it into your list.
Creating our Form
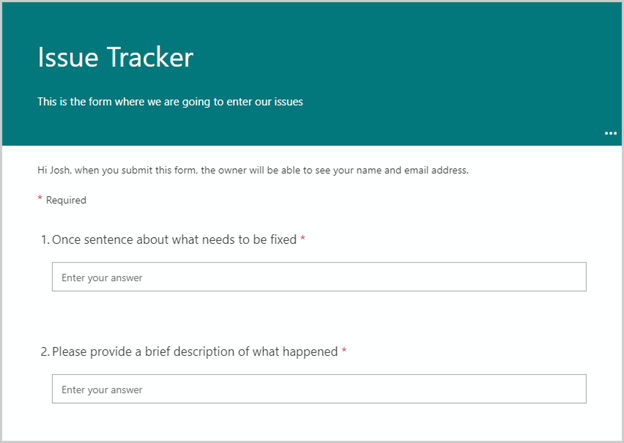
The first thing that we are going to do is create our form. We have gone over how to create forms in a previous blog, but, we are going to just do a quick review. The first thing that you are going to do is open Forms (forms.microsoft.com) and then select “New Form”. For this form, we are going to call it “Issue tracker”.
From here, we are going to need to create some questions for our end-user to fill out. If we look back at our list, the two questions that our end-user can provide us are the title and the description of what is happening.
To fill out our form, we are going to have “One sentence about what needs to be fixed” and our second question is going to be “Please provide a brief description of what happened”. We also need to make sure that both of our fields are required, to gather the most information that we can.
By the end, our form should look something like this:
Creating Our Flow
We can now start creating our flow to bring in the information that we can gather from the form. First, we need to select the “From when a response is submitted” flow trigger under “Automated cloud flow”, and name it. We will call this one "Issue submitted", to help keep track of exactly what it is going to be doing.
Once we have started it up, we now just need to point it at the Issue tracker that we just created.

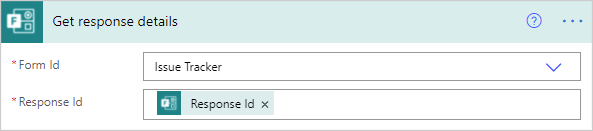
Now, we need to get the response details from our form to make sure that we can use the variables when we want to fill out. We will click into our new step, and select “Get response details”. We then need to point it at the Form and will pull down the Response Id from our previous step.
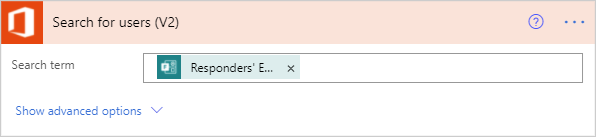
Once we have gotten our response information, and all of the details that we can use in our Dynamic content, we need to pull in the information of the user that submitted the issue.
To do this, we are going to add a step called Search for users. This will provide us with the user information of the form, and allow us to log them under "Issue logged by".
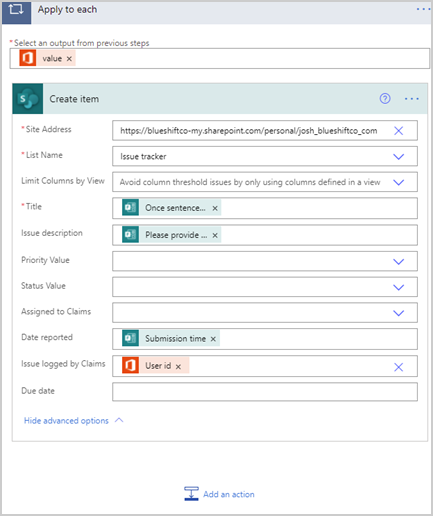
We can now pull our list details into our list. So, it is now time to add our list item. Click on "Next step", and we will put “Create item”. We will then just need to point it at our list.
Note: If you are using a personal list, you will have to select "Enter Custom Value", and then enter the URL of the list that you have pulled up.
Once you have tracked down your list, you just need to add your dynamic content to your Title, Issue description, Issue logged by claims, and date reported from the list that we created last week. Your final piece should look something like this:
Create More Apps Using the Power Platform
There you have it. Over the last two weeks, we have created an app that will allow your end-users to submit an issue, and auto-populate to your list. You can then fill-out the list, assign the issue to a user, and then you and the assignee will get a reminder two days before the due date.
This is a super basic build that took less than half an hour. If you have time on your hands, you can build out full applications. Imagine this: taking keywords, and creating priorities based on that, and automatically adding a due date. There are so many customizations, and you could even create an interface to make it look like and feel like a full app.