


Breakout rooms came out earlier this year and have changed how we can have discussions in meetings. This is Microsoft continuing to change how we can go about our day, and how we can move into a hybrid work environment and never have to worry about losing those day-to-day meetings and interactions.
What is a Breakout Room?
A breakout room is a set of rooms that is created by the meeting organizer. It allows the organizer to create smaller groups of people for the intent of discussion, and brainstorming.
As the organizer, you are able to:
- Create up to 50 breakout rooms.
- Name your rooms however you would like.
- Manually or automatically assign people to rooms.
- Make text announcements across all rooms.
- Bring everyone back into the main meeting.
- Bring rooms back individually.
As you can see, there is quite a bit that you can do as an organizer, and quite a few different ways that you can organize it.
A great use case for breakout rooms is you have a training session with multiple people, and you want them to be able to discuss the subject matter in smaller groups. Breakout rooms will allow you to have a smaller groups, then they can all have their discussions, and then you bring them back to the meeting and each group can speak on the subject, or you can continue your training. This will allow for the ability to collaborate and discuss, and then come back to the main meeting and continue the training.
Frequently Asked Questions
Now, before we get into how to create breakout rooms, and what we can do with them, let’s go over a few questions that have come up in conversation:
Can I present in multiple rooms at once?
Sadly you cannot. You can send text announcements that will cross all rooms, but you can only be in one room at a time.
Can you recall single users back from the breakout rooms?
You cannot. You can only recall entire rooms back to the meeting.
Can you go from room to room as an attendee?
No, you can only be in a breakout room that has been assigned to you, or that you have assigned to someone. Only the organizer can enter every room.
Can I send an announcement to a single room?
No, but you are able to enter any room as the meeting organizer and leave a chat or have a quick conversation.
How to Create and Manage a Breakout Room
Creating and managing breakout rooms is an easy process. To start, make sure that you are the one that has organized the meeting, and that you are using your desktop application. You should also check your meeting settings prior to you setting up your breakout rooms (which if you are not sure how to do, check out our post on managing meeting attendees).
If your "Who can bypass the lobby" settings are “People in my organization and guests”, you'll need to make sure that you have someone from your organization in each breakout room to allow everyone in.
If your setting is “Only me” your breakout rooms will not work, unless--as the organizer--you go into every room to let people in, and that defeats a lot of the purpose.
If you want all attendees to freely enter their rooms without requiring someone to let them in, set this to "Everyone".
Create Your Breakout Room
Now that everyone is in your meeting, you can create your breakout room. To start the process, you are going to click on the “Breakout rooms” button.

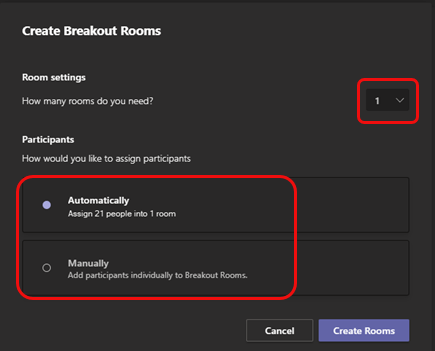
You will then get a pop-up, where you will get to decide how many rooms you need (up to 50), and how you would like to assign those rooms (automatically by Teams, or if you want to assign them manually to each room), and then click on “Create Rooms” .
Assign People to Breakout Rooms Manually
If you have chosen to go the direction of assigning groups manually, it is a fast and easy process. When the breakout room pane opens, you will select the “Assign Participants” button. You will then select everyone that you want to have in one room by clicking on the checkboxes beside their names.

Then, you will select “Assign” and select a room for the people you want together. You will then repeat the last two steps until you have assigned everyone in the meeting.
Start Using the Breakout Rooms
We have gotten everything set up, and we are now ready to use the breakout rooms. To use your breakout rooms, you have a few options. If you would like to start all of the rooms at the same time, you can click on the "Start rooms" button. Your attendees will receive a banner notification stated that you will be redirected in ten seconds.
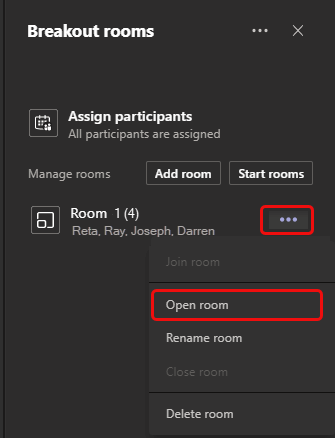
If you are wanting to move people room by room, for example, if you are assigning projects or speaking subjects to different groups, then you can click on the “…” and then “Open room”. Again, anyone in that room will get a ten-second warning, and then automatically be moved into the room.
Note: You can open and close rooms more than once a meeting.
Joining/Leaving Breakout Rooms
As an organizer, you can join any breakout room that is in progress.
To join a room, just click on the “…” and click on "Join room". This will bring you right to the room and you can join the discussion.

To leave a room, click on the “Leave room” button in the top right.
Sending an Announcement to All Breakout Rooms
If you need to communicate across all your rooms, be it either announcements, time updates, or discussion prompts, it is a quick couple of button presses.
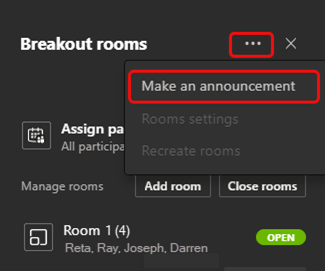
To make an announcement, click on the “…” and select “Make an announcement”, then enter your message, and hit send. Your participants will receive a notification that is marked important with your message.
Closing Breakout Rooms
You have now finished with your breakout session, and you need to return everyone to your main meeting. Just like opening them, you have a few options.
You can close each room individually if you want to return them room by room, and to do that, click the “…” then select "close room".
The other option is to close all the rooms at the same time and return everyone to your main meeting. To do this, click on the “close rooms” button, and then everyone will be returned in ten seconds.
Use it for Your Next Teams Meeting
As you can see, breakout rooms is a strong tool to help maintain the brainstorming sessions that we may be missing now that we are not in the office as much. This can also work for webinars, and large group functions as well.
If you want to keep an eye on what Microsoft is doing to continue to improve their breakout rooms, as well as everything Teams-related, check out their Teams roadmap.